L-MOUNT Forum

Register a free account now!

If you are registered, you get access to the members only section, can participate in the buy & sell second hand forum and last but not least you can reserve your preferred username before someone else takes it.

Handling, Setting up and Operating the S1RII

I actually do not really understand why HR would be more taxing on the lens. The camera takes 4 pictures very fast in succession with a n pixel offset, of 44mp each and combine them. So each picture has the same resolution characteristics of a single shot of 44mp (or with s5m2 24mp). If you combine them the resulting picture has more resolution due to the pictures being combined. But it is less limiting on the lens then a single 172mp sensor would need. I think it does not amplify a lens weakness like a very high resolution sensor would, just enlarge it mildly.
First, how and why does HR work? Remember that the sensor has a Bayer pattern that consists of separate red, green and blue photosites. For normal resolution the camera or your RAW converter has a de-Bayering algorithm that converts the photosite information into full color pixels. It does this by borrowing and interpolating the missing color data from the next door photosites. By the nature of the de-Bayering algorithm it loses resolution, so the camera has less "actual" resolution than the number of photosites implies. This is true for all cameras that use Bayer patterns. In the HR mode Panasonic cameras take eight images, displaced by half a photosite, left-right, up-down, and diagonal, and the color data from each adjoining photosite is picked up directly and filled in so that every photosite has full red, green, blue color (direct de-Bayering with motion). The eight half photosite displacements also provide enough information to segment each photosite into four pixels. Hence the segmented photosites can be read directly, and with four times the pixels. All in all this is an amazing process, and it emulates a sensor with four times the number of photosites.

The HR mode will benefit all lenses. But HR is best with higher resolution lenses that can deal with four times more pixels.
 
It is, but the software does 4 times the readout of the sensor with a slight offset enough to fit within the bayer structure of the sensor. And with that much more information we get an HR image. But it is less taxing on the lens then a single 61mp shot from Sigma FP-L although the resulting resolution from the HR mode suggests otherwise.

A 24mp with HR shot on a stationary subject (wall) will have much better corners resolution from a not so good lens, then a single shot of a 60+ mp sensor camera using the samen not so good lens.
 
FALSE COLOR
The S1RM2 has a new function for Panasonic mirrorless cameras, setting the exposure with FALSE COLOR. This can be used with either the Photo Mode or the Video Mode. FALSE COLOR is usually used on high end video cameras, and I've seen it on Atomos video recorders, but have not used it. But it is potentially very interesting - you look at the whole scene on the monitor or viewfinder and know what parts of the scene are over exposed, or under exposed, or just right. An old alternate to expose for best dynamic range is the Expose-to-the-Right (ETTR) method. But it is not very consistent or accurate. For quite some time Panasonic has had the Waveform Monitor; this has been my go-to method to set exposure for video. Unfortunately this is not available in the the Photo Mode. I almost always expose in the Manual mode and see the potential with FALSE COLOR to accurately set exposure for both Photo and Video. I have not used this very much yet, but I'm hoping with experience this will become a fast and accurate way to set exposure. I'll probably be using the Waveform Monitor as a crutch along the way.

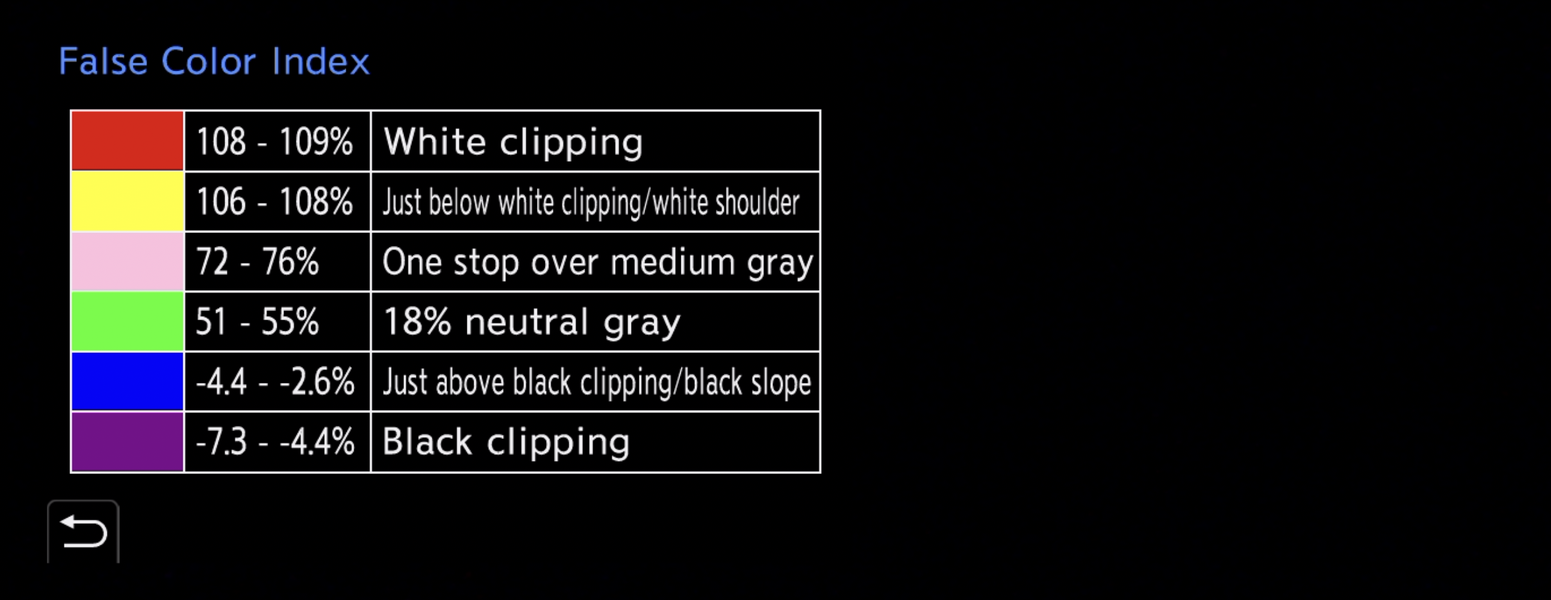
With FALSE COLOR the image colors on the screen are divided into six categories to represent the luminance levels. Here is the False Color Index from the camera menu.

Screenshot 2025-04-09 at 8.39.15 PM.png
 
Last edited:
Presumably FALSE COLOR works directly off the Raw file & not a compressed Jpeg thus giving you a more accurate exposure readout?

Looks like a great feature & will assign to a custom button,
 
I almost always expose in the Manual mode and see the potential with FALSE COLOR to accurately set exposure for both Photo and Video. I have not used this very much yet, but I'm hoping with experience this will become a fast and accurate way to set exposure.

Sigma have this on the fp L. I have one of the buttons customised to show False Color while held down and find it to be far more useful than the usual zebras or histogram since I can immediately see exactly which parts of the photo are likely to be overexposed or underexposed. I'm really pleased to see Panasonic have implemented this in photo mode on the S1Rii.
 
Presumably FALSE COLOR works directly off the Raw file & not a compressed Jpeg thus giving you a more accurate exposure readout?
It is after the color style, but the false color index is adjusted to reflect the style. This is pretty sophisticated if it works, but I have not thoroughly evaluated it.
 
Presumably FALSE COLOR works directly off the Raw file & not a compressed Jpeg thus giving you a more accurate exposure readout?

Looks like a great feature & will assign to a custom button,
I’d be very surprised if it’s off the raw data, but if it is, that would be a killer feature for landscape shooters to maximise DR. An easy way to test would be to vary the picture styles (flat, portrait etc) and see if the false colours change. If they do, it ain’t the raw data!

It’s worth mentioning that Olympus cameras have an over/under indicator system that uses orange and blue for over/under respectively. I liked that feature and was surprised that most other manufacturers provide only Zebras, or in some cases nothing at all in live view (e.g. Nikon).
Yes, I suspect we'll need to setup a style that best emulates raw data to use effectively with this, just as we have to do with zebras, blinkies, etc. At least, if you are a raw shooter.

I've been meaning to experiment with the false color, so thanks for posting Charles. Perhaps I'll assign it to the Most Annoying Button Ever (a.k.a. the red Record button on the front of the camera).
 
Last edited:
I’d be very surprised if it’s off the raw data, but if it is, that would be a killer feature for landscape shooters to maximise DR. An easy way to test would be to vary the picture styles (flat, portrait etc) and see if the false colours change. If they do, it ain’t the raw data!
As I mentioned in the post above, it is not off the RAW data, but after the color style. However the FALSE COLOR INDEX is adjusted to reflect the style. This is a pretty sophisticated approach.

I've been meaning to experiment with the false color, so thanks for posting Charles. Perhaps I'll assign it to the red Record button on the front of the camera.
Yes, I have assigned false color to the RED button. I don't like the red button anyway, even as a video shooter, and I always assign it to something else on Panasonic cameras.
 
As I mentioned in the post above, it is not off the RAW data, but after the color style. However the FALSE COLOR INDEX is adjusted to reflect the style. This is a pretty sophisticated approach.
I guess that's the next best thing. I can see the difficulties in doing based on the raw data.
 
VIDEO STUFF
The S1RM2 has interesting new video capability.

It has the well advertised 8K video, and ProRes RAW video, and ProRes and ProRes RAW can record internally to the CFexpress B card. These are reasons for video shooters to upgrade to this camera.

The S1RM2 is fully compatible with the new DMW-XLR2 XLR Microphone adapter with 32 bit float audio recording. This adapter was introduced the same time as the GH7, and at that time it was offered for free if you pre-ordered the GH7. This was good enough for me, and it induced me into getting the GH7 early. The advantage of float audio recording it that it is virtually impossible to saturate the recorder, it is a log format with very high dynamic range, so recording is much more reliable with little chance that louder sounds can be a problem. There are other 32 bit float recorders available, but the XLR2 integrates directly with the camera and has its own high quality preamps. I've used the XLR2 a lot with the GH7 and have learned to really appreciate it, so it is a welcome addition to the S1RM2. After the XLR2 was released, there were firmware updates to make it compatible with the S5II, S5IIx and G9II, but 32 bit float is not available for these cameras. That is, the XLR2 is compatible with these, but for them it doesn't have much advantage over the original XLR adapter. The S1RM2 has another nice touch with the XLR2. While it can record 4 cannel audio, if you only record 2 channels the S1RM2 only outputs 2 channels with the video. This is unlike the other LUMIX cameras where a couple of other blank channels are recorded with the video and you need to delete them in the video editor. This is a minor irritation, but an irritation nevertheless. The S1RM2 doesn't have this issue so it is a nicer implementation.

The S1RM2 has a new smart phone app, Lumix Flow. This app can help to logically set up and perform your workflow for a video. But it also functions as a second video monitor for the camera, and this gives a larger monitor for shooting video. It has some nice features. It can directly control shutter speed, aperture, ISO and exposure composition from the phone's touch screen. A couple of things I like, you can turn focus peaking and zebras off and on, and this actually turns these off and on in the S1RM2, so if you have the camera set up the way you like for these functions, they display directly on the phone's screen. This is very un-like other second monitors I've used where they have their own versions of focus peaking and zebras, and they look different and may work differently than the camera's versions you are used to. Some downsides for Lumix Flow, it only works with video, not for photos. And a phone screen is not super bright so the monitor is limited in direct sunlight. Also, FALSE COLOR doesn't display on the phone.

I have a SmallRig smartphone holder that attaches to a cold shoe. The DMW-XLR2 has a cold shoe on top. So I've combined the DMW-XLR2 with Lumix Flow and my smartphone. This is a simple rig that doesn't use a cage, and it works well.

PGH70900.jpg
  • Panasonic - DC-GH7
  • LEICA DG 12-35/F2.8
  • 17.0 mm
  • ƒ/2.8
  • 1/320 sec
  • Pattern
  • Manual exposure
  • ISO 100


PGH70899.jpg
  • Panasonic - DC-GH7
  • LEICA DG 12-35/F2.8
  • 17.0 mm
  • ƒ/2.8
  • 1/320 sec
  • Pattern
  • Manual exposure
  • ISO 100
 
Back
Top