L-MOUNT Forum

Register a free account now!

If you are registered, you get access to the members only section, can participate in the buy & sell second hand forum and last but not least you can reserve your preferred username before someone else takes it.

The S5 mk 1 tips & tricks thread

I almost always shoot with M. It probably comes from my video days where you don't want the exposure to change while you are shooting. Now and then I try to adapt to S or A for photos, but it usually doesn't go well. I do use M with Auto ISO for photos fairly often, but then I'm all over exposure comp to get what I want.
I previously shot Aperture mode pretty much exclusively. Someone suggested Auto ISO plus minimum shutter speed, and I quite liked that. From the perspective of quickly changing from static subjects, to moving subjects where the light on your subject can change pretty rapidly when you're in say cities, between buildings, under trees to out in direct sunlight. And so on.
The trouble with that was your minimum shutter speed is quite different between the two (moving and static) Which required a dive into the menus to change. And that's what I'm really liking about M plus Auto ISO. Everything is there, directly under your fingertips. All I have to think about is minimum shutter, and a suitable Aperture. The focus lever is right there under your thumb. No menu diving. At all. Plain Jane M mode requires a dive into the ISO settings menu to get the required shutter speed via ISO at times, and by then I've missed the shot. I'm happy to set Exposure comp, and leave it at that for a particular situation. At worst, it might be 1/3 - 2/3 of a stop out. I can live with that :)
You may be able to tell from this that I try and shoot minimum ISO and shutter speed, to maximise both Dynamic range, and image quality. This makes it a lot easier in post, less fiddling around in the raw processor, which makes me happy.
In saying that, I've got a C mode setting saved now, M mode, ISO 100, F10, 1/50 shutter speed, single point AF, which I can quickly swap to for landscape scenarios.
I'm not trying to tell anyone else how to suck eggs, just sharing a bit of info derived from real life experiences wandering around strange cities. Where sensory overload happens quite regularly, and having a super quick, easily accessible setup just makes things so much easier and less frustrating.
I'm chasing quick, simple, efficient and effective. Along with excellent image quality.
Happy shooting :)
 
Last edited:
He he he he he. A further refinement. This is the fantastic thing about going on a decent holiday, and spending some quality time working with your camera. On a consistent, ongoing daily basis.
Auto ISO. Or getting away from it, as it can sometimes cause me a bit of a WTF moment.
So, what I've now done is assign ISO to the Rear Control Dial. The one that surrounds the 4 way arrow keys and menu button. There's no need to activate ISO with another button. It's direct to the wheel. Twirl it one way or the other & the ISO ramps up or down as desired. Super quick & intuitive. I never used the dial for anything, it was just sitting there taking up space. It still works to scroll through the menus once you dive into them, it's just tied to ISO in shooting mode.
I now have EVERY exposure parameter (and more) direct to hand (or finger) on a dial.
So just to recap, I now have front dial as Shutter speed, rear dial as Aperture, rear Control Dial/wheel as ISO, AF mode still on the lever, and the AF on button set to AF point scope -so I can leave the camera in AFC and still over ride it with AFS if required. Brilliant. Just brilliant. No C settings needed. I think might still set C1 as a Landscape mode -F10, ISO 100 and a suitable shutter speed, we'll see.
Anyway, I'll give that a spin for a few days, and see if something annoys me :)
 
Oh, Another tip. The Control Dial set is a bit tricky to find. I was hunting around in Fn button set, it's not there. It's actually under Dial Set. 4 lines below Fn button set. So go to Dial set, enter, then 3 lines down to Control Dial Assignment. You've then got 4 choices there, I've set mine to ISO. Done
 
Great idea.

Also, playing with this you can alternately set the control dial to Exposure Comp. And leave Auto ISO ON. I'll try both of these methods.
Yeah. Strangely enough, the issue I was having with Auto ISO, was in good or mixed lighting conditions on static subjects. I'd set a non arbitrary shutter speed, like 1/500, F10, go to tweak the Exposure comp a little bit, and I would only notice after that the camera had been ramping up the ISO. When I could easily have dropped the shutter speed to say 1/100, with no issue and stayed right down at base ISO.
With manual ISO I can see all the exposure parameters before I half press the shutter, and be set up in advance so to speak.
I now have two distinct exposure comp modes. In poor/low light ISO becomes the exposure comp, in good light it's shutter speed. All right there directly controlled by individual dials/wheels. No combination button presses, it's right there. Very very quick.
Sounds more complicated than it actually is, but seems to be working for me :)
 
Great idea.

Also, playing with this you can alternately set the control dial to Exposure Comp. And leave Auto ISO ON. I'll try both of these methods.
I've had a bit more of a think about what you said. I may have even found a use for C modes :)
What I have now done, (it sounds more complicated than it is) is set C1 for indoors, dimmer light and static shooting. I've set the rear control dial to ISO for this C mode, as lighting isn't really changing quickly, and use the ISO as exposure comp as desired. Shutter speed to 1/80, Aperture to F2.8-3.5 (inside) and so on.
Now what I've done for C2, is set it up for action or faster shooting. Set the rear dial to Exposure comp, and Auto ISO. Shutter speed to 1/400, Aperture to F3.5, etc etc.
The fabulous thing about this is that the rear dial now works in exactly the same way, it's working as Exposure comp, but when things get fast and furious, Auto ISO is much much quicker than me at adjusting Exposure. In C2 mode. I went 1/400 shutter as that's about I like to go for reliable results when panning. And it's only a couple of little clicks on the front dial to drop down to 1/200 or 1/250 for slower moving subjects. Or a couple of clicks the other way up to 1/800 and beyond, for faster moving subjects
Like I wrote, it sounds more complicated than it actually is, but it isn't. It works seamlessly enough, that I don't even think about it. Twirl that rear control dial, lighter or darker exposure. Doesn't matter what C mode you're in.
 
Last edited:
I used the Post Focus mode of the S5 OG to make a picture of the strangest (but most delicious Z04 Sabber) strawberry I have ever seen in my life... I am not a macro photographer and I don't know if this can be considered a macro photography, but I did put the Lumix 14-28mm (macro) very very close and the S5 on a tripod to use this post focus feature.
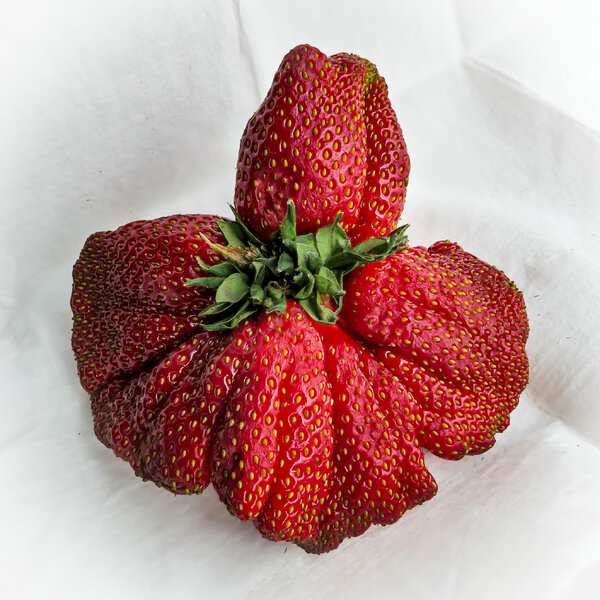
P1469929.jpg
  • Panasonic - DC-S5
  • LUMIX S 14-28/F4-5.6
  • 18.0 mm
  • ƒ/4.5
  • 1/500 sec
  • Pattern
  • Auto exposure
  • ISO 500


The Panasonic Lumix S5's post focus mode allows you to select the focus point of a captured image after it's been taken. It uses the camera's 4K technology to record a series of images with different focus points, and then you can choose which one you want to save.

Here's how it works:
- Turn on Post Focus: In the camera's menu, navigate to "Others Photo 2" and enable Post Focus.
- Choose a Focus Mode: You can select either 4K (8MP) or 6K (18MP) post focus.
- Capture the Image: Press the shutter button, and the camera will record a series of images at various focus points.
- Select the Focus Point: After the camera has processed the images, you can view them and choose the specific points you want to be in focus.
- You can choose "range merge", where you choose the points or zones of the image that you want in focus or "auto merge", where the camera metes all points like a focus stacking.


I find this option faster than the usual focus bracketing, because I don't need to download the images, use photoshop, etc., right?

And I think this feature is not available in the S5II /X. I don't know if it is again implemented in the new S1s.
 
I used the Post Focus mode of the S5 OG to make a picture of the strangest (but most delicious Z04 Sabber) strawberry I have ever seen in my life... I am not a macro photographer and I don't know if this can be considered a macro photography, but I did put the Lumix 14-28mm (macro) very very close and the S5 on a tripod to use this post focus feature.
I don't believe I've ever had my S5 on a tripod. That I can think of anyway :) That's great info. I'll have to get round to trying it out at some stage. Thanks for the tutorial Daumenhoch SmilieDaumenhoch Smilie
 
Back
Top