L-MOUNT Forum

Register a free account now!

If you are registered, you get access to the members only section, can participate in the buy & sell second hand forum and last but not least you can reserve your preferred username before someone else takes it.

A demo of Lumix S5 V-Log footage.

robin0112358

Active Member
After my last video, folks might be excused for thinking I am incompetent. ;-)

To remedy that, I went out this afternoon and shot some quick test footage, which will be useful for all those "does image stabilisation work?" and "what does V-Log look like?" and "is the kit lens any good?" questions.

We can also chat about the grading, if that interests anyone.

P.S. Sorry for any cross-posting if you are also seeing this on Facebook.
 
To remedy that, I went out this afternoon and shot some quick test footage, which will be useful for all those "does image stabilisation work?" and "what does V-Log look like?" and "is the kit lens any good?" questions.

We can also chat about the grading, if that interests anyone.
Nice smooth video. You mention there can be some resolution loss with stabilization. That isn't due to stabilization, it is camera motion blur; I presume you are using about a 180 degree shutter and you get natural blur when you pan the camera (that's the purpose of the 180 degree angle). If you go to a much higher shutter speed it will not have the blur, but you can then see stuttering.

About grading with DaVinci Resolve, I'm pretty lazy and use ACES with the Panasonic V35 Input Transform. And I adjust lift, gamma and gain for the look I want. If you edit in SDR you can use the Rec.709 Output Transform, and that is it. (I always produce in HDR and typically use Rec.2020 ST2084 as the Output Transform.)
 
Stabilisation
My understanding is that stabilisation will crop out a few pixels around the edge, as it reorients the image within the frame specified by the video format. This is clearly so in Resolve, since you can tweak the amount of stabilisation and compare results. A similar process must be happening in camera as well.

Grading
It seems there are several ways of setting up a colour grading workflow. I don't use ACES since I doubt it will benefit me without a calibrated 10-bit monitor and other components of a professional workflow.

Instead I set up Color Management in the Project Settings for the correct input and output spaces.
  • Color Science = DaVinci YRGB Color Managed
  • Input color space = Panasonic V-Gamut/V-Log
  • Timeline color space - > Davinci WG/intermediate
  • Output color space: Rec.709 Gamma 2.4
(Honestly not sure if the Timeline color space setting matters much.)

In the Colour tab I set up a group for all similar clips. Then I can apply a few standard nodes. The most important is the Colour Space Transform:
  • Input Colour Space = Panasonic V-Gamut
  • Input Gamma = Panasonic V-Log
  • Output Colour Space = Rec.709
This gets the technical part of the grade done.

It seems redundant to use this Transform when the project already has the input/output spaces qualified. But otherwise the footage does not get processed correctly. Can't say I understand that.
 
Stabilisation
My understanding is that stabilisation will crop out a few pixels around the edge, as it reorients the image within the frame specified by the video format. This is clearly so in Resolve, since you can tweak the amount of stabilisation and compare results. A similar process must be happening in camera as well.
Here is my understanding. With normal stabilization, which is IBIS, the sensor can move around enough so there is no clipping of pixels. This is the same with lenses that have stabilization, and also when they are combined with IBIS, so there is no loss of pixels. With both E-Stabilization (Video) and Boost I.S. (Video) the camera uses a smaller pixel region so there are extra pixels left-right and top-bottom so the electronic gyro can direct the correct pixels to be selected for this added stabilization. However, fortunately, the camera still has enough pixels in this smaller space for C4K or 4K pixels so there is no loss in resolution. The effect is a somewhat longer apparent focal length, but the same resolution.

It is different with DaVinci Resolve's (excellent) stabilizer. in this case there aren't any extra pixels laying around, so when the stabilizer does it's work and trims the image back to eliminate the out-of-frame edges, it does throw away pixels and there is a loss of resolution. The software interpolates this back to C4K or 4K frames, but with some loss in resolution.

This is one reason I like to work with 6K or 5.9K with the S5II. There extra pixels beyond 4K, so after Resolve stabilization there are still more than enough pixels and there is not loss in resolution when you are working on a C4K or 4K timeline.


Grading
It seems there are several ways of setting up a colour grading workflow.
I've not worked much with DaVinci YRGB Color Managed. Doesn't it pick the color space from the camera metadata, or do you need to input it manually for Panasonic? I'm not sure why you would also need the Transform information in the Color Tab. What happens if you don't add that?
 
Thanks for that explanation. I thought that the edge pixels in the highest resolutions would be lost, since the entire sensor is being read. But even if this was true, there is no noticeable decrease in image quality.

Yes, "DaVinci YRGB Color Managed" picks the colour space from clip metadata, at least for RAW files. Otherwise it uses the input colour space as specified in the Project Settings, which is why I set that to be V-Gamut/V-Log. Using the timeline space as DaVinci WG/intermediate gives the widest gamut possible, so this method should also support HDR etc. (all this according to the manual, which I dutifully read.)

But the clips are being identified as Rec.709 (Scene) not Panasonic. So I tested two possibilities.

First Method
I left the clips as they were, possibly mis-identified, and these Project Settings:
  • Color Science = DaVinci YRGB Color Managed
  • Input color space = Panasonic V-Gamut/V-Log
  • Timeline color space = Davinci WG/intermediate
  • Output color space = Rec.709 Gamma 2.4
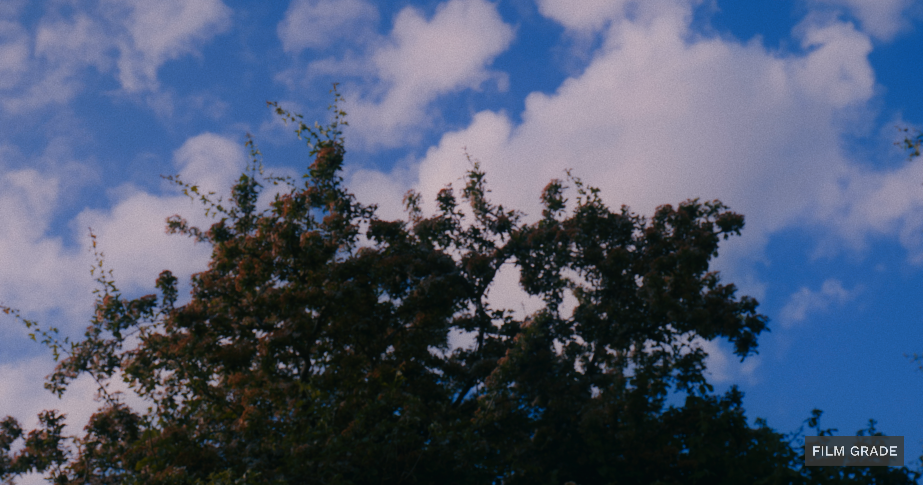
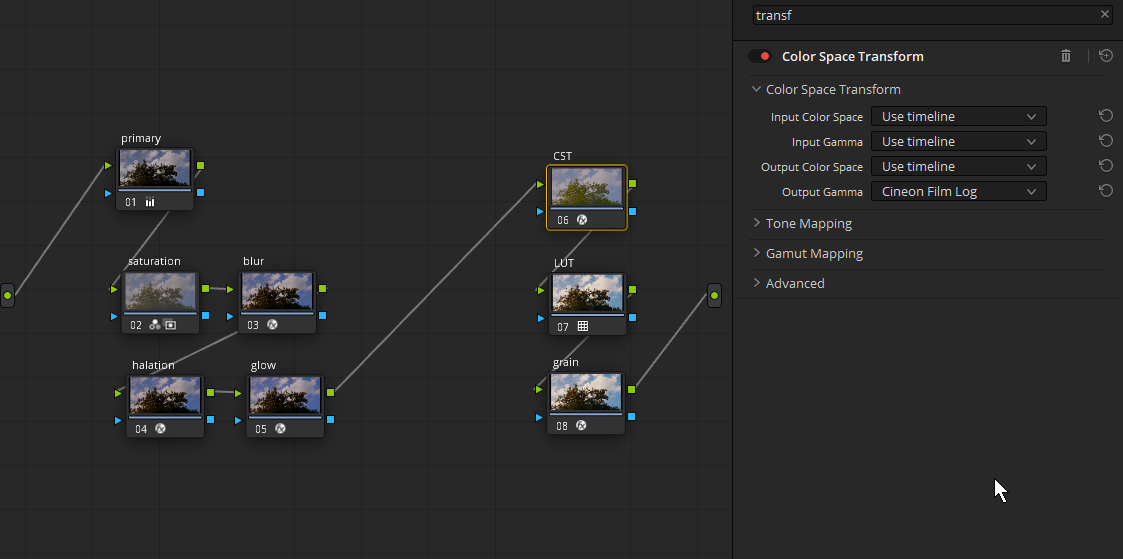
grading process 1.png

The colour grading goes through a five nodes in the DaVinci WG space (see above). At the end of the chain I used one of DaVinci's film LUTs. Though it's not obvious, these require Cineon Film Log as input, and output Rec.709. So I put a Colour Space Transform prior to the LUT. Now, you would think that I could leave the transform inputs as the timeline defaults and simply change the output gamma to Cineon Film Log. But the result is horridly wrong.

Instead I set the Input color space and gamma as Panasonic V-Gamut and V-Log. I guess because the clips were mis-identified? But to me that's two wrongs that magically work out to be correct! Result of the powergrade is this, ready for individual clip grading.

shot 1.png


Method 2

Project Settings no longer manually specify the input spaces:
  • Color Science = DaVinci YRGB Color Managed
  • Color processing mode = SDR Rec.709
  • Output color space = Rec.709 Gamma 2.4
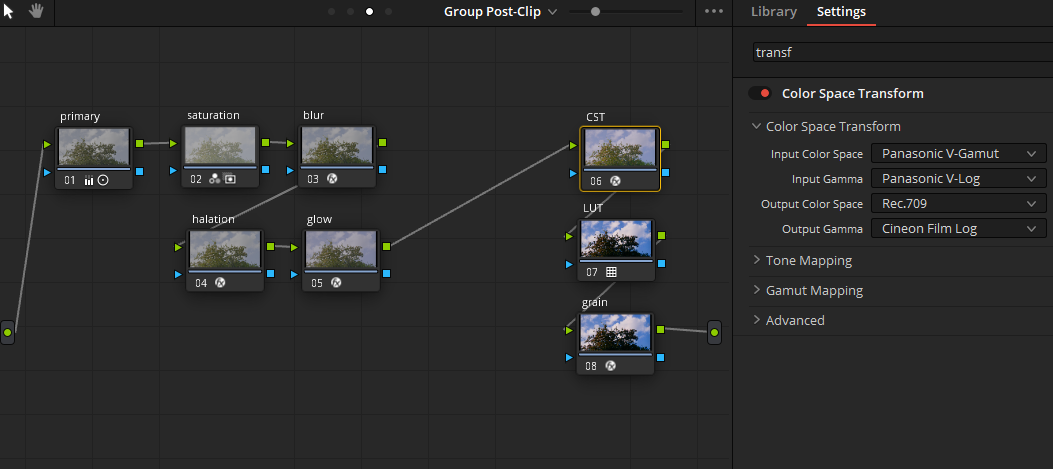
grading process 2.png

Next, I manually identified all of the clips as being Panasonic V-Log/V-Gamma, so they could be managed properly. In the CST I relied on the timeline settings (above).

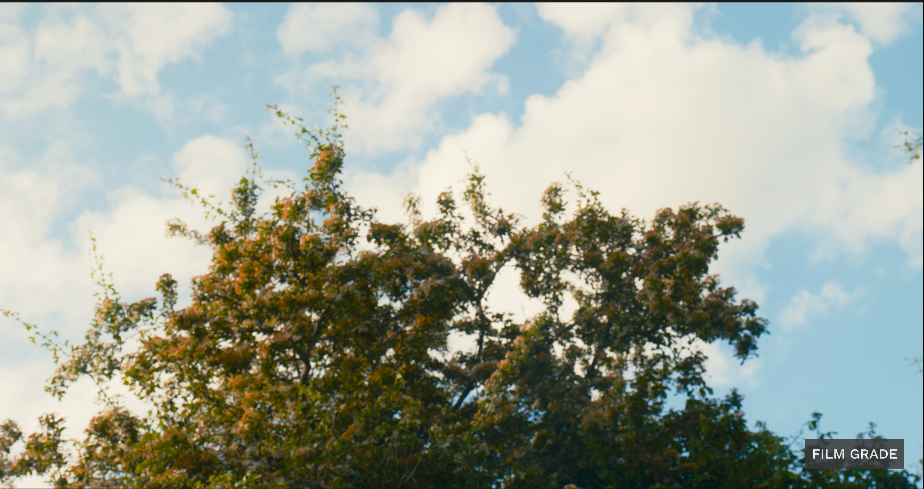
The results are not at all the same.

shot 2.png

Obviously I don't understand this at all!
 
Obviously I don't understand this at all!
Nor do I. If I get a chance I'll work with DaVinci YRGB Color Managed and see if I can sort this out. In the mean time you really should give a try to the ACES approach I suggested, and bypass all this hassle. Don't worry about a fancy color monitor and all that, you aren't producing for broadcast color, just a consistently good and simple approach. If not that, just use DaVinci YRGB.
 
DaVinci YRGB Color Managed is designed to be simple like ACES but with an even wider gamut. The only reason I have a transform in the chain is to use the DaVinci LUT because otherwise there's no need for CSTs. But since I am stumped at the logic, I will give ACES a try.

[time passes]

In the project settings I set the input colour space as Panasonic Varicam and the clips are tagged correctly. That's one automatic step that wasn't happening before. I set the "process node LUTs" to ACEScc which, according to the manual, uses a Cineon-style log encoding with improved shadows. The clips now look fine in the scopes.

But I can't figure out how to use the DaVinci Film Look LUT in this colour space. It does horrible things to the image. I guess that's OK! I can ignore it and just design the colour myself.

While it would be nice to know why DaVinci YRGB Color Managed doesn't work, all I really need is a standardised workflow for any projects I work on. So thanks for prompting me to look at ACES!
 
Correction: ACEScc in previous should be ACEScct.

I now have the DaVinci Film Look LUT working correctly. The trick was to find appropriate pre and post CSTs.

I will write all this up in an article.
 
Stabilisation
My understanding is that stabilisation will crop out a few pixels around the edge, as it reorients the image within the frame specified by the video format. This is clearly so in Resolve, since you can tweak the amount of stabilisation and compare results. A similar process must be happening in camera as well.

Grading
It seems there are several ways of setting up a colour grading workflow. I don't use ACES since I doubt it will benefit me without a calibrated 10-bit monitor and other components of a professional workflow.

Instead I set up Color Management in the Project Settings for the correct input and output spaces.
  • Color Science = DaVinci YRGB Color Managed
  • Input color space = Panasonic V-Gamut/V-Log
  • Timeline color space - > Davinci WG/intermediate
  • Output color space: Rec.709 Gamma 2.4
(Honestly not sure if the Timeline color space setting matters much.)

In the Colour tab I set up a group for all similar clips. Then I can apply a few standard nodes. The most important is the Colour Space Transform:
  • Input Colour Space = Panasonic V-Gamut
  • Input Gamma = Panasonic V-Log
  • Output Colour Space = Rec.709
This gets the technical part of the grade done.

It seems redundant to use this Transform when the project already has the input/output spaces qualified. But otherwise the footage does not get processed correctly. Can't say I understand that.
If youre working in a color managed project set up like the one you described you do not need to use a CST to do your log transform. if your clips are still showing the log version you can right click the clip while in the color page and in the drop menu select Input Color Space and choose the V-log setting. Sometimes resolve won't automatically transform the clip like it should in a color managed project.
 
Give this a watch also and also check out all of Cullen Kellys videos on his YouTube channel.

 
I have found more success replacing the Blackmagic workflow with ACES. I have written a series of articles documenting this.
Nice work Robin. A note, lots of the forum members here won't be wanting a film look. For example, I almost always do travel logs with a documentary look, so there is very little grading. This is strait out of V-Log with just Lift, Gamma and Gain adjustments; more like processing your pictures in Lightroom. But now and then it can be great to do something more creative.
 
Nice work Robin. A note, lots of the forum members here won't be wanting a film look. For example, I almost always do travel logs with a documentary look, so there is very little grading. This is strait out of V-Log with just Lift, Gamma and Gain adjustments; more like processing your pictures in Lightroom. But now and then it can be great to do something more creative.
I would enjoy replicating a film look. To each their own, I suppose.
 
I just did it for fun. :) And to learn more about the different gamma/gamut properties. The look I wants depend on the content but I wouldn't normally be chasing a film look. But I think it's useful to know what constitutes the appeal of this aesthetic and what qualities it depends on.

Context: I teach university students who are too young to be nostalgic for the things they nonetheless crave!
 
Back
Top